Showing posts with label DIY. Show all posts

Sunday, November 24, 2013

{Thanksgiving Pallet Art}

Today I'm sharing a fun DIY pallet art project with you that's perfect to add to your home decor this Thanksgivning!

This project was made in partnership with JoAnn Fabrics but all ideas and opinions are my own.

I wanted to make a little something for our Thanksgiving buffet table this year and this is what I came up with! Let me walk you through how I made this fun little piece of pallet wood and Whoville inspired Thanksgiving tree!

 We have a bunch of salvaged pallets so we're always looking for cool stuff to do with them. Aside from a few items I had around the house, most supplies were purchased at my local JoAnn's. Here is what you'll need to make the sign:
  • piece of pallet wood. Mine is cut to about about 9" long.
  • craft paint in whatever color you choose. I did one very light coat. I wanted a touch a color, but also for the distressed wood to show though.
  • "thanks" letters using some fun scrapbook paper and cut with my Cricut Mini
  • wire letter typography...I got some electrical wire at home depot then covered it with my favorite chunky yarn and a pompom made with my small {pink} Clover pompom maker. Here is a great detailed tutorial on how I did the cursive lettering.
  • once I got the letters covered with yarn I hot glued them onto the pallet and prayed they'd stay standing...and they did yay!
I could not love my little pompom tree more! Here's how I made it...

  • found a milk bottle in my stash which I adore. If you don't have a milk bottle, any vase will do!
  • pom poms! Grab some fall colored yarn scraps and your Clover pompom maker and get cracking. I made 9.
  • I found some sticks in the backyard and hot glued the pompoms to the sticks.
  • Add your pompom sticks to your vase and you're done! 
Head to JoAnn's with this fab coupon and get crafting!


I love the charm and sweetness this will add to our Thanksgiving table!

Have a blessed day friends!


Elizabeth
Pin It

Wednesday, April 17, 2013

{DIY Coffee Bar...and DONUTS!}

Hi friends! I'm packing like a crazy person and gearing up for SNAP tomorrow! Can't wait, but first I'm sharing a fun little DIY project with you!

 We entertain A LOT. And we are coffee people so making this cute little coffee bar area in our dining room was really fun!

My husband sanded and painted two TV trays and bolted them together which created a super fun little station for me to go crazy with! We have a Keurig that we use daily, but for entertaining, we still need a larger coffee pot. I buy that coffee at Target. It's delish and super CHEAP cost effective, not to mention the can is way adorable and I use them as vases after we empty them out. Hydrangeas and daisies look fab in there. I hit up World Market recently and got those stacking mugs and crazy cute cookie jar. The mugs are GINORMOUS. They double as ther perfect ice cream bowl too! I'm slowly adding some cute stuff to the wall above. I want to add a few more hoops and maybe a coffee print or two.

Here is a closer look at the TV trays turned coffee station! Super simple and fun project for all my coffee loving friends!

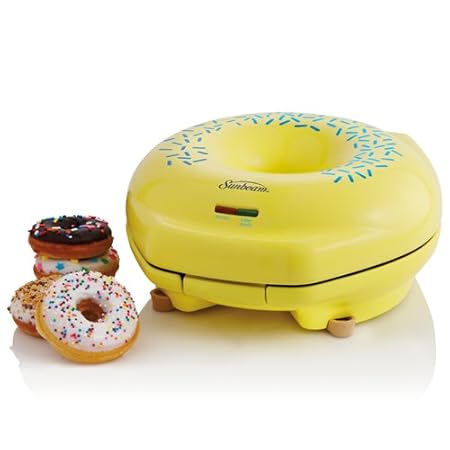
And what goes better with coffee than DONUTS! A few weeks ago I bought this awesome Sunbeam Donut Maker on clearance at Target for $15 and it has been really fun!


So far, my favorite donuts have been these Cinnamon Toast Crunch ones I made for crafting brunch with some of my girlfriends!

They couldn't be easier too! I bought the Cinnamon Toast Crunch Muffin Mix (Target) and made it up according to the package directions. I poured the batter into a ziploc and snipped off the end so I could pipe the batter into the donut maker. I got about 15 donuts from the batter. Once they were cool, I glazed them with a simple powdered sugar/milk glaze and dipped them in the crumb topping that comes with the mix. They were so good! Big hit with my crafty lady friends!

Now you're set to enjoy some coffee and donuts with good friends! Have a happy day!

Elizabeth
Pin It

Wednesday, March 13, 2013

{DIY: Shower Curtain to Front Door Curtain TUTORIAL}

Hi there! My mom was visiting a few weeks ago and she helped me with a little front door makeover!

I don't know about you, but as soon as spring hits, I want to redecorate ALL THE THINGS.

I had big plans to make some new curtains for the window on our front door, but after pricing out the amount of fabric I would have needed, it would have been over $35. No thanks! 


 On a recent trip to Home Goods, I ran accross this awesome Cynthia Rowley paisley shower curtain for $14. Done.

This was SUPER easy to make! Here we go!


All I did was fold down the edge that has the button holes for the curtain hooks. I folded down their existing hem line which was the perfect size for the rod I was hanging it on it. I stitched it down with a 3/8" seam allowance.

Then I hung it up on the door and measured how much I needed to cut off. Sorry I don't have a pic of that part. I marked where I needed to cut plus and extra inch for the seam.

After I cut it to the length I needed, I just hemmed up the bottom edge. I pressed it up 1/2 inch, then another 1/2 inch and stitched it down at 3/8" seam allowasnace.

That's it! Easy peasy and way more cost effective than trying to make my own from scratch! I love when that happens! And guess what?!?

Since I was able to cut so much off the bottom, there is tons of fabric left to make some pillows for the couch! 

Have a great day!

Elizabeth
Pin It

Thursday, December 20, 2012

{Christmas Treats and DIY Parchment bags}

Hi friends! I hope you've had a fabulous Christmasy type week! I've been making lots of gifts and treats and today I'm sharing what I'm giving to our neighbors!

I went with SUPER easy treats this year! My motto is always "simple food tastes the best".

Fist up...

Christmas Crackers:
1 box/bag oyster crackers
1 packet dry ranch dressing mix
1/4 cup canola oil
1/2 tsp garlic powder

Preheat oven to 250. Mix together ranch, oil, & garlic powder. Add crackers to ranch mixture and toss evenly with wooden spoon to coat. Line cookie sheet with foil {I hate washing cookie sheets} spread crackers evenly onto sheet. Bake for 15 stirring every 5.

Seriously people. These are AMAZING. I'm not actually sure how much the neighbors will get if I don't back away from the bowl.

OK, next is the easiest fudge in the world. Three ingredients. You ready?

3 Ingredient Fudge:
3 cups chocolate chips
1 can sweetened condensed milk
2 tsp vanilla

Melt the chocolate chips and condensed milk together until smooth. Remove from heat and stir in the vanilla. Pour in to parchment lined 8" square pan. Let sit for 4 hours or until cooled completely. Remove from pan. Peel off parchment and cut into pretty little squares.

Alright now for the treat bags. I had originally intended on buying little clear bags at Target, but they were out so I had to get crafty and make some little parchment bags.

 I don't know about you, but I think those are a million times cuter than what I could have bought at Target!

Parchment Bag Instructions:
Take your roll of parchment and cut a 6" piece from the roll. Fold the bottom up but leave a 3 inch portion as your flap. Sew down each side with a 1/4" seam. Fold flap down and adhere with some fancy washi tape! So simple and cute!

Each bag will hold about a cup of crackers or 6 pieces of fudge.

Enjoy friends and Merry Christmas to YOU!!!


Elizabeth
Pin It

Thursday, September 20, 2012

{DIY: Fabric iPhone Case}

Hi friends! I'm sharing a fun little tutorial with you today! 

 I'm sort of obsessed with cute iPhone cases, but they are REALLY expensive so I'm showing you an awesome and inexpensive way to dress up your phone! Here we go!
 Supplies you need:
  • A clear case. I found mine at Nordstrom Rack and it was $8. It's plastic, not silicon or rubberized so you shouldn't have a problem with a case like this yellowing. If you don't have a Rack near you, try Marshall's, Ross, or TJ Maxx and I bet you'll find on on the cheap!
  • Fabric scraps
  • card stock
  • pencil
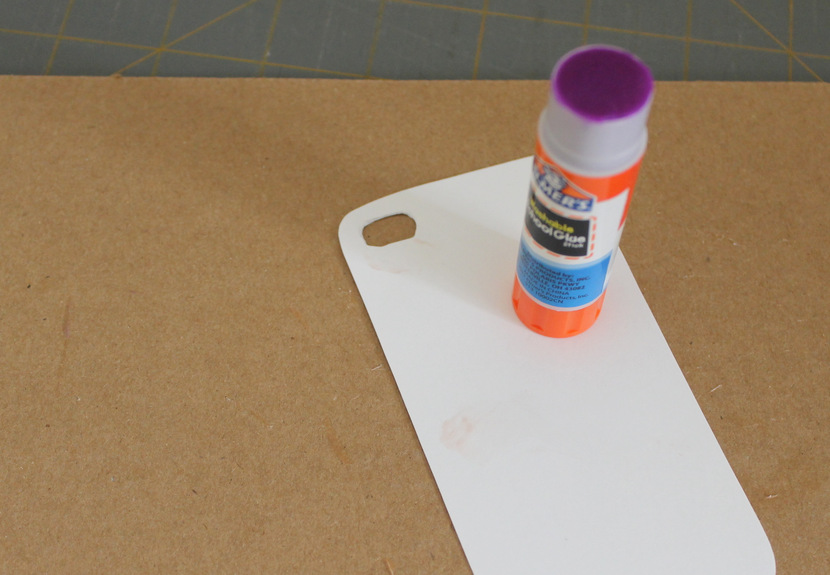
  • glue stick
  • tiny scissors/exacto blade
  • fray check is optional
 First you are going to trace your case onto card stock. Trace as many times as you want. I made 3. I like variety :) Trace the little hole for the camera too.
 Next, cut the shapes out. You'll cut out the tiny camera hole too. That part is a beast, sorry! I found it easiest to cut out the case shape then score the center of the little hole with the blade for my scissors to poke through, then carefully cut it out.

Once you have the inserts cut out, you will want to put it into the case to make sure it fits and to make sure the hole is in exactly the right place. You may have to fiddle with it and give it a little trim until it fits in the case properly.
 Now you will apply your glue to the card stock. Make sure you apply the glue to the correct side and that the little hole you very diligently cut out is now in the top left corner.
 Place your insert glue side down to the WRONG SIDE of your pretty fabric. I let the glue dry for a few minutes the cut around the edge. Then I cute out the little hole. Again, that part is a beast, but you'll get through it.
 This next part is optional, but for a neat finish, apply fray check to the edges making sure to get the edges of the camera hole as well. After it dries, snip away any loose threads.
 That's it! So pretty right!?! I think this one is my favorite!

Ta da! 4 brand new iPhone cases for $8 plus a few things you probalby already have lying around. I just saved you like $100 AT LEAST!

Happy crafting!

Elizabeth
Pin It

Thursday, June 28, 2012

{summer recipe: watermelon popsicles}

Summer was made for popsicles. I'm a huge fan of the Otter Pop {Louie-Bloo Raspberry please}, but lately I've been wanting a healthier summer treat that I don't have to count any Points {WW} for. I had some watermelon in the fridge so I whipped up these watermelon popsicles and they are FABULOUS!

 Super easy too!

Indredients:
1/2 mini seedless watermelon
juice of 1 lime
1 Splenda packet (or a tsp of real sugar in you aren't a fan of the faux stuff)
1 tsp vanilla

Directions:
Place all the ingredients in your blender and blend until smooth. Pour into your popsicle mold (I got mine at Walmart) and freeze for at least 8 hours. Makes 4-8 pops depending on your mold. 

These are my new favorite treat and if you do WW like me...no points! It's all fruit and 0 point ingredients. 

Enjoy! Happy Summer!

Elizabeth
Pin It

Thursday, May 31, 2012

{Beach Bag Tutorial}

Hi friends! I have a super fun summer project to share with you today! With summer approaching quickly I knew we needed a beach bag, but I'm super cheap and can't find one I like to fit my tiny budget so...diy time! 

I wanted to make a bag out of a towel so I did a little Googling and what do you know, our good friend Martha Stewart had a great towel beach bag! However, I found the directions majorly lacked details so if you are a visual person like me I hope you'll appreciate a few more pictures, descriptions and easy tweeks! Here we go!


Supplies:
1 hand towel in the same color {Target $3.49 for a 2-pack...at the bottom of this post I'll show you what I made with the extra towel!}
webbing, twill, tape, ribbon, or fabric to make your handles, each cut to 25"
2 buttons (optional)
basic sewing supplies


I chose to make my own handles out of fabric as opposed to using webbing, but you can do whatever you want! Just make sure you have 2 25" lengths of whatever you chose to use.

 Pin your handles to the long side of your hand-towel 7.5 inches in from each side. You are also pinning them 3" down from the top. Make sure not to twist the handle. It should look like a "U".  Also make sure you pin the handle to the "right side" of the towel. I left the tags on the towels so it would be easy for me to tell which side was which. 

Stitch each side of the handle down in a rectangle to reinforce the straps and make sure they are nice and strong. It will look like this...

 Now you are going to lay your hand towel on top of the short side of your bath towel and mark where you need to put the other handle. Martha's directions tell you to get a hand towel that is the same width as your bath towel. Mine was like an inch and a half shorter, but I made it work. Center your hand towel onto your bath towel (if they aren't the same length) and pin as a marker where you need your other handle to go.
 All pinned and ready to stitch down the same way you stitched the other handle. In a rectangle to reinforce the straps.
 Ok, now the straps are attached so lay them right sides together matching the handles and the top edges. See how my hand towel is a little shorter? Irritating, but it really doesn't matter too much. If I was super fancy and had a serger, I would have trimmed the bath towel to the length of the hand towel and serged the raw edge, but I'm not fancy.
 Once everything is lined up, pin the bottom edge of the hand towel to the bath towel.
 Stitch down with a 3/8" allowance. *Note: I used my walking foot because terry cloth is cushy. Worked well, but if you don't have a walking foot, just use lots of pins and go slow.
 Now you are going to pin the sides and stitch them down also using a 3/8 allowance.

All stitched!!! This is how you lay on it at the beach. You can put your cover up or something in the pocket as a pillow. Awesome but here is the fun part...flip the bag part inside out...
 See how the towel is hanging out? Roll it up and tuck it inside. It will look like this...
 Love it! Except for those little flappies that the excess bath towel made, but never fear...buttons to the rescue!
I just hand sewed a button to each flap and it's holding it down and out of the way just fine. 

Want to see what I made with the extra towel???
A fun little pouch to hold my wallet, phone, sunscreen and anything else on the small side that I don't want floating around in the big bag!

I hope this tutorial makes sense! It's really not hard at all and you end up with a really good sized bag to take with you to the beach! I can't wait for summer!!!

Check out Martha's bag which was my inspiration and guidelines for this bag.


Elizabeth
Pin It
Related Posts Plugin for WordPress, Blogger...