Showing posts with label simple. Show all posts

Wednesday, August 28, 2013

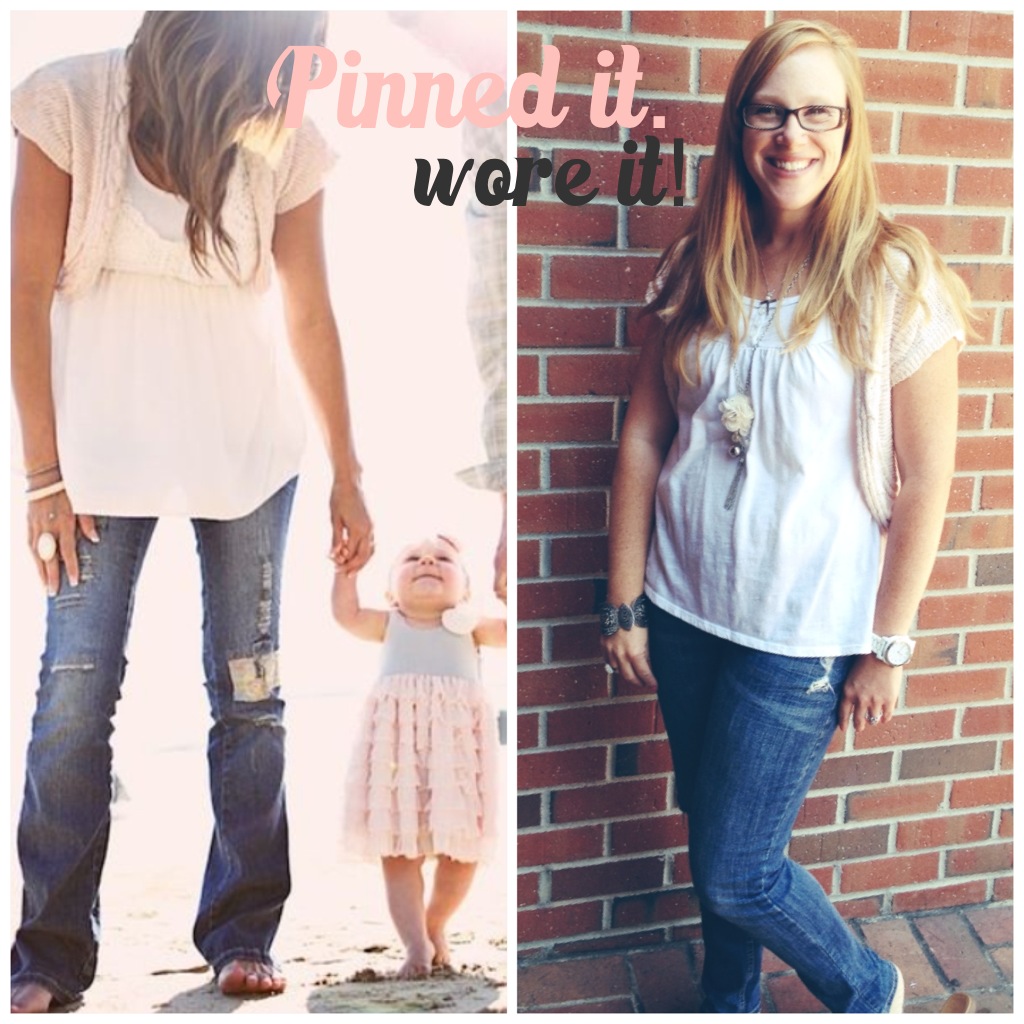
{WIWW: Pinned it...Wore it!}

Hi friends! I hope you're having a great week! This is our last week of summer and we are soaking up every last bit.

I'm linking up with Lindsey at The Pleated Poppy today for What I Wore Wednesday!

Don't you just love it when you already have everything in your closet for an outfit you pinned? That's my favorite.

Shrug: Forever 21
Top: Target
Necklaces: Amy Cornwell and Charlotte Rousse
Watch: JCP
Cuff: Nordstrom
Distressed Skinnies: Target

Take a look at my Style Pinboard for more inspiration and go shop your closet!


Elizabeth
Pin It

Thursday, January 17, 2013

{Crochet Roundup: Great projects for beginners}

I love to crochet during the fall and winter months. There's just something so cozy about curling up on the couch with a quilt and some brightly colored yarn that just makes me so happy!


Are you learning to crochet? Or at least wanting to learn? If you are, I've put together a fun round-up of projects that I think are great for newbies! These projects are all made with basic stitches and will build upon your new found skill. They all come together relatively quickly so you'll be patting yourself on the back in no time!

Here are links to all of these projects:

2. Bow
5. Beanie

The patterns are all really simple to follow and I've made each of them multiple times! Want to see my most recent accomplishments? Ok!


This was my very first crochet blanket and I just adore it! It's HUGE!!!! I made it way bigger than the original tutorial (which is a baby blanket). I ended up using 3 skeins of each color (9 total). I went with the Red Heart Super Saver yarn on this project. I got it on mega sale so the cost of the blanket was under $30. Way cheap! I decided to add a little granny stripe type border to the blanket just to give it a finished look. I love the way it turned out! Really nice Sunday naps have been happening.


My first granny square pillow!!! These were the very first grannies I ever made. I actually made them last summer and it's taken me this long to do something with them! The tutorial that I've linked you to shows you how to sew them together as well. In hindsight, it would have been better to border them all in the same color, but this was my first go and I'm pleased with it. I found a lot of inspiration on Pinterest for pretty pillows, but no great methods for constructing them so I came up with one on my own. Tutorial coming soon :) 

I hope you're inspired to learn to crochet! It's so fun I promise!

Have a happy day friends!

Elizabeth
Pin It

Thursday, December 20, 2012

{Christmas Treats and DIY Parchment bags}

Hi friends! I hope you've had a fabulous Christmasy type week! I've been making lots of gifts and treats and today I'm sharing what I'm giving to our neighbors!

I went with SUPER easy treats this year! My motto is always "simple food tastes the best".

Fist up...

Christmas Crackers:
1 box/bag oyster crackers
1 packet dry ranch dressing mix
1/4 cup canola oil
1/2 tsp garlic powder

Preheat oven to 250. Mix together ranch, oil, & garlic powder. Add crackers to ranch mixture and toss evenly with wooden spoon to coat. Line cookie sheet with foil {I hate washing cookie sheets} spread crackers evenly onto sheet. Bake for 15 stirring every 5.

Seriously people. These are AMAZING. I'm not actually sure how much the neighbors will get if I don't back away from the bowl.

OK, next is the easiest fudge in the world. Three ingredients. You ready?

3 Ingredient Fudge:
3 cups chocolate chips
1 can sweetened condensed milk
2 tsp vanilla

Melt the chocolate chips and condensed milk together until smooth. Remove from heat and stir in the vanilla. Pour in to parchment lined 8" square pan. Let sit for 4 hours or until cooled completely. Remove from pan. Peel off parchment and cut into pretty little squares.

Alright now for the treat bags. I had originally intended on buying little clear bags at Target, but they were out so I had to get crafty and make some little parchment bags.

 I don't know about you, but I think those are a million times cuter than what I could have bought at Target!

Parchment Bag Instructions:
Take your roll of parchment and cut a 6" piece from the roll. Fold the bottom up but leave a 3 inch portion as your flap. Sew down each side with a 1/4" seam. Fold flap down and adhere with some fancy washi tape! So simple and cute!

Each bag will hold about a cup of crackers or 6 pieces of fudge.

Enjoy friends and Merry Christmas to YOU!!!


Elizabeth
Pin It
Related Posts Plugin for WordPress, Blogger...