Showing posts with label bag. Show all posts

Wednesday, August 14, 2013

{oh, just a little summer crafting}

Summer is wrapping up for us. Just a few weeks left before the little goes back to school. Bittersweet really. We've had a great summer, but I always love getting back to routine. Routine is my favorite. But for now, we're soaking up these last few days the best we can!

Content provided in partnership with JoAnn Fabrics. I was compensated for my editorial work, however all thoughts and experiences are my own.


Summer has had us on the go a lot. We almost always are bring lunch and snacks and toys and various things along wherever we go so I figured it would be fun to make a tote bag with Carter that was just his! A place to contain all of his stuff that ultimately he is responsible for. Want to see how we made it???

 Gather your supplies! A plain white canvas tote, your colors of choice, any appliques or embellishments you'd like to add. Not pictured, the squeeze bottle we used to mix the dye in and then used to apply the dye. Note: We ended up not using the appliques which bummed me out because I thought they were cute, but Carter likes things plain. Anyhow...
 We did this project in the bathtub. Line your tub with and old yucky towel you don't care about. Wet and squeeze dry your tote. Section off with rubberbands. Mix dye according to the package directions.
Grab some gloves, and let your kid squirt the dye on the bag. He figured out the pattern he wanted and went for it. Good times.
Mix your next color and repeat the squirting process. Yes, it's very hard to tell that we used orange AND yellow because they look exactly the same. Once you're done dyeing, let it sit for a bit then rinse it under water until the water runs clear. Snip your rubber bands off and unscrunch your bag.
Ta-da! We let our bag air-dry outside for a few hours then we gave it a quick wash in the washing machine by itself. All done and ready to use!

Carter loaded his tote up with a few books, some little toys, and Uno and we went to the park to soak up some sunshine!


If you're like us and have a few weeks left of summer there's still time to do some fun crafty stuff with your kids! Head on over to JoAnn's Cape Discovery and check out all the awesome projects.

Sign up HERE to become a preferred JoAnn's customer and receive a 20% coupon as well as notices of great sales and money saving coupons!

Please feel free to Pin this image to Pinterest with the hashtag #summerofjoann :)
Elizabeth
Pin It

Wednesday, September 19, 2012

{Introducing TWO new fall products!}

Hi there! I hope your week is off to a great start! I was able to sit at Starbucks for a while yesterday and draft a few posts. Feels nice to get back into the swing of things distraction free! I think I will make Starbucks my new office and come at least once a week to get my posts written. At home, I have ADD and just can't force myself to sit down and write!!! I'll keep you posted on how it's working for me!

I'm so excited to be introducing TWO NEW Michelle Patterns to the shop this fall!

First up is the Key Chain Clutch

This is one of my very favorite patterns to make! This little Key Chain Clutch is perfect for quick errands or as your wallet in a bigger bag.
  The back pocket is large enough for your phone with a case on it and the front pocket is zippered so you don't have to worry about your cash, cards, or coins falling out! It also has a little ribbon tab to attach your matching key fob!
 
 I just love mine and have been taking it everywhere! I hope you'll love it too!

The next new product I'm introducing to the shop is...

 The Reusable Market Tote
This is a large bag! It's designed to be just like the plastic grocery bags but much prettier and environmentally friendly! They are made of designer cotton, but are lined with a sturdy canvas for lasting durability. Each seem is reinforced with a triple stitch so be assured that these bags will last a long time and you'll look super cute using them!

I'm really excited to finally be sewing for the shop again! I'm working hard on these products this week so I should have them listed in the shop for you soon!

Have a happy day!

Elizabeth


Pin It

Thursday, June 14, 2012

{Weekender Bag: Pattern Review}

Hey there! Happy Thursday to you all! TODAY IS THE LAST DAY OF SCHOOL!!!! Summer here we come! So excited to slow down and do some fun stuff with my boys!

We have several trips planned for the summer months which prompted me to finally make this Weekender Bag! I've been hoarding the pattern for over a year. Got it at a JoAnn's pattern sale for $1. Sweet deal. This is a great bag. It's big. I mean REALLY BIG.


This is Simplicity Pattern 2274 designed by Studio Cherie. Like I mentioned above, I got mine at JoAnn's during a sale, but it is also available on Amazon. I'm going to show you a few pics of my finished bag and tell you a few things that helped me along the way should you decide to make one of your own! For reference, this is comparable in size to the large Vera Bradley bag.

To construct this bag you need:

*8 ounce polyester quilt batting 1.5 yards
*Muslin (or other desired lining fabric) 44” wide, 1.5 yards
*Feature Fabric 44” wide or 54” wide, 1.5 yards
*Contrasting fabric for handles 44” or 54” wide, one yard
*#5 Nylon Coil Zippers one at least 21” long and one at least 13” long
*Jute Webbing (found in upholstery notions)3.5” wide, 3.5 yards
*Optional Wide Seam Binding 6 yards

Dimensions:
20"(51cm)long
12"(30.5cm)deep
12" (30.5cm)high
Strap Drop 11"(28cm)long enough to wear over your shoulder.

Sew Chatty Notes: I am not of fan of polyester batting. I like the finished look and feel and weight of cotton batting way better so I chose to use cotton. However I didn't get enough! This bag is GIANT! I ended up piecing some scraps together which worked but took a lot of extra time! If you choose to use cotton batting instead of polyester, make sure you get enough! I chose to use a Kona cotton solid for the lining instead of muslin. For the outer fabric, you just can't go wrong with Amy Butler! Her large beautiful prints lend themselves to a beautiful finished bag! I couldn't find the jute webbing so I used 2" wide twill tape instead and it worked out just fine. I just had to narrow the handle strips. NBD. I love how they turned out. I did not bind my seams either. The pattern didn't recommend that, but she does mention it on her shop listing. Anyhow, I did finish all the seams with a zig zag stitch and I'm confident that they'll hold up nicely.


Here is a close up of the outer pocket on the front of the bag. Great for maps, tickets, itineraries, etc...


This is the outer, pleated, zipper pocket. Super handy for chargers and other small items you don't want floating around inside.


A close up of the quilting! I quilted it much heavier than the pattern said to, but I like the quilted look. I made sure to cute my lining and batting pieces an inch wider/longer to account for any shifting during quilting. I quilted straight vertical and horizontal lines and doubled my horizontal lines with an additional stitch line 1/4 below the first. I also did a lot more top-stitching than the pattern said to. I like top-stitching. Pretty and sturdy!

Some additional things you might find helpful: I would consider this an intermediate sewing project. The construction is pretty straight forward of you've made bags, quilted and worked with zippers before. If you want to save yourself A LOT of time...buy pre-quilted fabric from the fabric store and use a pretty print as the pockets, handle, and tab accent. This bag cost about $40-$50 to make and about 15 hours of time total. I am making bags for my husband and son and have already purchased pre-quilted fabric for theirs as well as really fun prints for the accents.  I would probably us a layer of interfacing on the tabs next time because they feel a little flimsy to me. This bag came together really easily with no seam ripping at all!!! Woo hoo! The trickiest part is attaching the side pieces to the body. Make sure you really pay attention to the pattern markings. I found it easiest to stitch the top, then each side, then the bottom.

Hopefully my tips will help you if you decide to make yourself a pretty new bag! If you have any other questions I'll be happy to answer in comments.

See, I told you it was big! ;)

I can't wait to take her on many many summer trips! If you make one, I really want to see it so post the link in the comment section ok??? I wish you all happy and safe summer travels!

Elizabeth
Pin It

Thursday, May 31, 2012

{Beach Bag Tutorial}

Hi friends! I have a super fun summer project to share with you today! With summer approaching quickly I knew we needed a beach bag, but I'm super cheap and can't find one I like to fit my tiny budget so...diy time! 

I wanted to make a bag out of a towel so I did a little Googling and what do you know, our good friend Martha Stewart had a great towel beach bag! However, I found the directions majorly lacked details so if you are a visual person like me I hope you'll appreciate a few more pictures, descriptions and easy tweeks! Here we go!


Supplies:
1 hand towel in the same color {Target $3.49 for a 2-pack...at the bottom of this post I'll show you what I made with the extra towel!}
webbing, twill, tape, ribbon, or fabric to make your handles, each cut to 25"
2 buttons (optional)
basic sewing supplies


I chose to make my own handles out of fabric as opposed to using webbing, but you can do whatever you want! Just make sure you have 2 25" lengths of whatever you chose to use.

 Pin your handles to the long side of your hand-towel 7.5 inches in from each side. You are also pinning them 3" down from the top. Make sure not to twist the handle. It should look like a "U".  Also make sure you pin the handle to the "right side" of the towel. I left the tags on the towels so it would be easy for me to tell which side was which. 

Stitch each side of the handle down in a rectangle to reinforce the straps and make sure they are nice and strong. It will look like this...

 Now you are going to lay your hand towel on top of the short side of your bath towel and mark where you need to put the other handle. Martha's directions tell you to get a hand towel that is the same width as your bath towel. Mine was like an inch and a half shorter, but I made it work. Center your hand towel onto your bath towel (if they aren't the same length) and pin as a marker where you need your other handle to go.
 All pinned and ready to stitch down the same way you stitched the other handle. In a rectangle to reinforce the straps.
 Ok, now the straps are attached so lay them right sides together matching the handles and the top edges. See how my hand towel is a little shorter? Irritating, but it really doesn't matter too much. If I was super fancy and had a serger, I would have trimmed the bath towel to the length of the hand towel and serged the raw edge, but I'm not fancy.
 Once everything is lined up, pin the bottom edge of the hand towel to the bath towel.
 Stitch down with a 3/8" allowance. *Note: I used my walking foot because terry cloth is cushy. Worked well, but if you don't have a walking foot, just use lots of pins and go slow.
 Now you are going to pin the sides and stitch them down also using a 3/8 allowance.

All stitched!!! This is how you lay on it at the beach. You can put your cover up or something in the pocket as a pillow. Awesome but here is the fun part...flip the bag part inside out...
 See how the towel is hanging out? Roll it up and tuck it inside. It will look like this...
 Love it! Except for those little flappies that the excess bath towel made, but never fear...buttons to the rescue!
I just hand sewed a button to each flap and it's holding it down and out of the way just fine. 

Want to see what I made with the extra towel???
A fun little pouch to hold my wallet, phone, sunscreen and anything else on the small side that I don't want floating around in the big bag!

I hope this tutorial makes sense! It's really not hard at all and you end up with a really good sized bag to take with you to the beach! I can't wait for summer!!!

Check out Martha's bag which was my inspiration and guidelines for this bag.


Elizabeth
Pin It

Friday, March 23, 2012

{shop update}

Hi friends! Happy Friday! I am so ready for the weekend! It's supposed to rain hear on Sunday so I have big plans to curl up the couch with my Kindle and READ!!! 

There are a few new things in the shop{s}!


This is the LAST Belted Tote in this color way! It can be yours HERE.

The yellow and gray color way sold out at my show last weekend, but good news for you...I have enough fabric to make TWO MORE!!! If you're interested in one, shoot me an email and I'll get you on my custom order list! {sold out, sorry friends! Stay tuned for more bag updates!}

Thank you all SO MUCH for the love on my DIY Business cards!!! 


 I was overwhelmed by the response I received to the tutorial! I love that you loved it! Do you need something cute to carry your new business cards in??? Well I can hook you up! 

Two different styles to choose from! Both have two interior pockets and both will hold your business cards, cash, debit card AND your phone!!!


 So fun. They're my favorite! I carry mine everywhere. 

Lastly, there is a new crochet item in my Etsy shop!


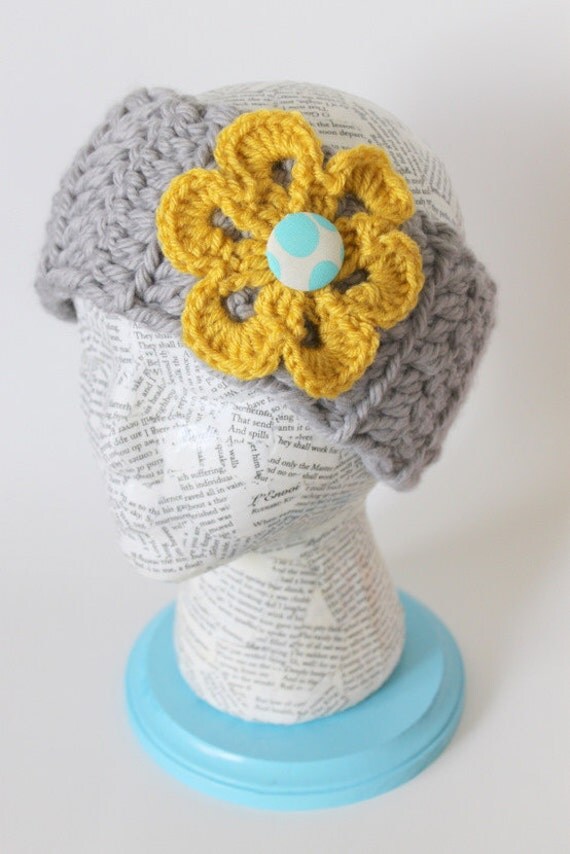
A fun chunky headband with a flower and a fabric covered button. Cozy perfection. It can be yours HERE. I am hoping to whip up a few more this weekend if I have time! 

Have a great day everyone!


Elizabeth
Pin It
Related Posts Plugin for WordPress, Blogger...