Showing posts with label tutorial. Show all posts

Saturday, March 22, 2014

{Tutorial} Adding Commercial Handles to Handmade Bags

Hi everyone! I have a great little tutorial to share with you today that will take your handmade bags to the next level! Commercial store bought handles will give your tote the perfect finishing touch and make you look like a total professional. And really it could't be easier!

JoAnn Fabrics makes spring crafting so simple during national craft month with a $5 off $25 or more purchase coupon and spring crafting inspiration website!


Supplies Needed:
Commercial Handles (I got mine at JoAnn's. They're microfiber.)
Fabric scraps for creating tabs-4 pieces cut to 2"x2 1/2"

Favorite tote or purse pattern…pieces cut and ready to go
general sewing supplies

Alright, let's get to it!


1. Cut your tabs. 4 pieces at 2x2 1/2 inches
2. Fold in half along long side and stitch with 1/4" seam allowance (repeat for all four tabs)
3. Press seam open.
4. Turn inside out. Press. Press in half wrong sides (seam side) together and insert through ring of handle.
5. Baste edge closed with 1/4" or 1/8" inch seam. Whatever you feel comfy with but also be mingle of your bag pattern. If your pattern calls for 1/4 seams, use 1/8 so that your basting stitches are hidden in the seam.
6. Repeat for all four tabs and you're done! Now you can follow your bag pattern.


Oooooooh ahhhhhhhh. See what a difference that makes?!?!? Looking good. 


Here is the inside of my bag. Other professional touches I like to add are magnetic snaps, pockets, and boxed bottoms. These little details make such a huge difference in the finished look, functionality, and style of your bag.

All these supplies can be purchased at your local JoAnn's! Happy crafting friends!!

Elizabeth
Pin It

Tuesday, December 10, 2013

{Crochet Boot Cuff TUTORIAL}

Hi friends! I have a fun crochet tutorial to share with you today! 

I have been making LOTS of boot cuffs. They are such a fun accessory for the cooler months. Anyhow, I've tried out several different patterns both free tutorials I've found online and patterns I purchased when those didn't work out... Anyhow, in my quest for a pair of boot cuffs that fit my need for quick and simple gifting, I have found nothing. But like they say, "necessity is the mother of invention"...so I came up with my own pattern and they are quick and simple and CUTE. You'll be able to whip these up in a bout an hour, plus I'm showing you how to package them all professional like too. You're welcome.

Pin this image!
Pin this image!
Supplies:
worsted weight yarn
size H 5mm hook
yarn needle
scissors
buttons
 Chain 35. Note: 35 worked great for me, but you may need to add or decrease chains depending on your calf size.
 Join chain with slip stitch being careful not to twist your chain.
 Chain two.
 DC in each chain all the way around.
 You made it!
 Join with a slip stitch to top of first DC. Chain 2. Turn.
 DC in each chain around. Repeat pattern for 8 rows.
 Done! Fasten off and weave in your ends. Now make the second cuff the same way.
After you weave in all your ends, add your buttons. I like to add mine to the second row from the top and on the sides. Be mindful to keep your seams in the back and also that you are adding one button to the right side of one cuff and one to the left side of the other so that you have a right and a left. Make sense?

Front View
Side View


 Alright, lets talk packaging. These will make a GREAT Christmas gift for any accessory loving girl in your life. 

Supplies:
Kraft paper. A strip that measures about 3x15 is perfect.
Stamp kit
tape
cute tape to cover the functional tape

Method:
Stamp your wrapper. Wrap it around the cuffs and tape it closed with the clear tape. Then place the cute tape over that tape. Pictured below.

Fabric tape is from Daiso. I love it so much!
For these ones I added a little rosette pin too. For the rosette pattern click here. For the leaf pattern click here.

I hope you enjoy this tutorial! Happy stitching!!


Elizabeth
Pin It

Thursday, September 26, 2013

{Mug Sweater TUTORIAL}

Happy Thursday to you! I hope you have enjoyed Crochet Week so far! If you're stopping by for the first time today, be sure to scroll through the other posts!

Today I'm releasing my Mug Sweater pattern as a FREE tutorial woohoo!!


Click HERE to download the full pattern! Or you can reference the embedded portion below. Enjoy!


Don't forget that this week only you can take 10% off my One Skein Infinity Scarf Pattern with the code INFINITY10.

Happy Stitching!

Elizabeth
Pin It

Tuesday, September 24, 2013

{Mason Jar Cozy TUTORIAL}


Hey there! Welcome back to Crochet Week at Sew Chatty! Today we're making a super cute crocheted mason jar cozy and showing you how to package it up all cute and ready to gift.


Mason Jar Cozy Pattern
Cotton Yarn {I use "I Love This Cotton" from Hobby Lobby}
Size H 5mm hook
scissors
Yarn needle
Ch 3. Join into a ring.
Round 1: Ch 3. 12 dc in ring. Join. (12 sts)
Round 2: Ch 3. 2dc in same sp, *2dc in next st; repeat from * around.
Join. (24 sts)
Round 3-11 DC in each stitch. Join (24)
Round 12-13 SC in each stitch to form the band. Join (24.)
Fasten off. Weave in ends.

 Add some extra goodies and you have the perfect little gift!
 Mug Rug tutorial by Knitty Bitties. One of these days all my edges will be straight. Practice.
 Tie up some Via's with coordinating thin fabric strips.
Brown paper bag. Some tissue. A little handmade tag. Perfect. 

***SHOP DISCOUNT***
Take 10% off my One Skein Infinity Scarf Pattern this week with the code INFINITY10. 


Elizabeth
Pin It

Monday, September 23, 2013

{Crochet Embroidery Hoop TUTORIAL}

Hi friends! We're kicking off a week full of crochet happiness with a fun tutorial!


I recently took place in an embroidery hoop exchange to help raise funds for my sweet friend Emmy's adoption. I had so much fun making my hoop! I'll show you the finished hoop (and another one I just finished) at the end of this post :)

In an effort to be creative and different, I decided I wanted to crochet around the rim of the hoop! Having no clue how to do this, off to the interwebs I went. I found nothing. Sad day. So I had to wing it...my specialty! I posted a sneak peek of what I was up to on Instagram and the people went nuts so I new a tutorial was soon to follow. Well folks...here it is!

 You'll need:
A hoop. Any size. This is a 5".
Cotton yarn. I used "I Love This Cotton" from Hobby Lobby. Best. Yarn. Ever.
A size H 5mm crochet hook
scrissors
yarn needle
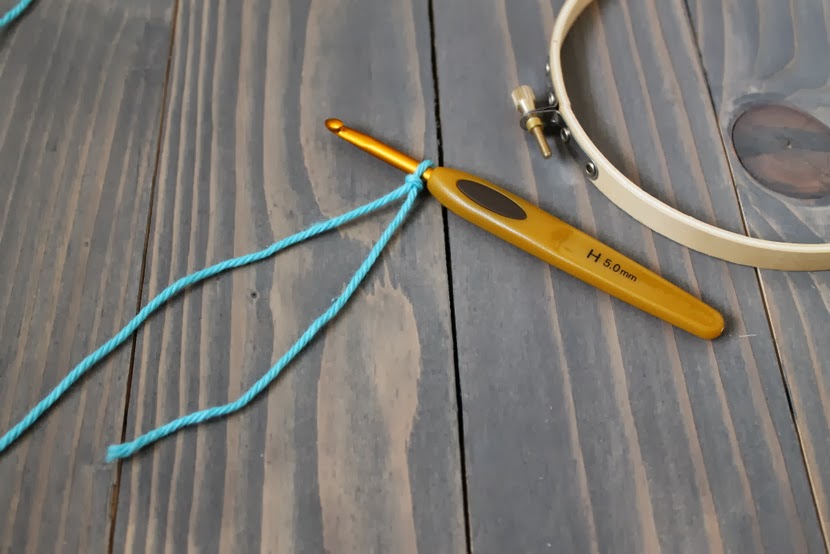
 Start by separating your hoop. You are only crocheting around the outer hoop. I like to keep the screw in the hoop while I'm working. It just feels more stable to me that way. I don't want things flopping about. You will kind of have to shimmy your hook around the screw to start, but it's not that bad I promise. Now you will attach your yarn to your hook with a slip knot.
 Attach your yarn to your hoop with a slip stitch.
 Now comes the fun part! Row one is just single crochets all around the hoop. In a perfect world this would be a video tutorial, but I'm just not that techy yet. So here is the step by step...pretend you are working a magic circle, but instead of the circle being yarn, it's an embroidery hoop.
  1. Instert the hook into the hoop.
  2. Pull up a loop of yarn.
  3. Yarn over.
  4. Pull through loops on hook.
See? Single Crochet. Easy right? Keep doing that all the way around.
 Yay we're almost done with row one!
 ...annnnnnd done. I did take the screw out as I got closer just to make sure my stitches covered the hoop completely.
 Ok, row two! Chain one. Turn.
 Now you are going to be working a simple scallop all around the hoop. The pattern is as follows...*skip stitch, 5 double crochet in next stitch, skip stitch, single crochet in next stitch. Follow pattern from * all the way around. Now is a good time to reinsert the screw to stabilize the hoop.
 Lookin' good! Keep scalloping.
Great job! Now take the screw out again so you can finish your last scallop. I've gotten lucky every single time I've done this and had exactly enough single crochets in row one to finish out the scallops in row two perfectly, but if you're coming to the end and it's not working out, just skip and extra stitch or shimmy in an extra scallop and smooth it out on the hoop. No big deal.
Now just fasten off, weave in the ends and you are ready to fill your hoop! Here are the finished ones I've made!


Aren't they adorable?!? I hope you enjoyed this tutorial. Go hoop it up my crafty friends!

***SHOP DISCOUNT***
 Take 10% off my One Skein Infinity Scarf Pattern with the code INFINITY10.


Elizabeth
Pin It
Related Posts Plugin for WordPress, Blogger...